
大数据之 Hadoop-9-Zookeeper-Linux 服务端集群搭建
一、集群安装Zookeeper
由于在Zookeeper集群中,会有一个leader服务器负责管理和协调其他集群服务器,因此服务器的数量通常是单数,例如 3,5,7等,这样数量为 2n+1 的服务器就可以允许最多n台服务器的失效。
本例使用三个节点(centos01, centos02, centos03)搭建部署 ZooKeeper 集群。
1、Zookeeper下载安装
在centos01 节点中,切换到目录 /opt/softwares/ 中,并进入到该目录中,先下载,然后解压到目录 /opt/modules/
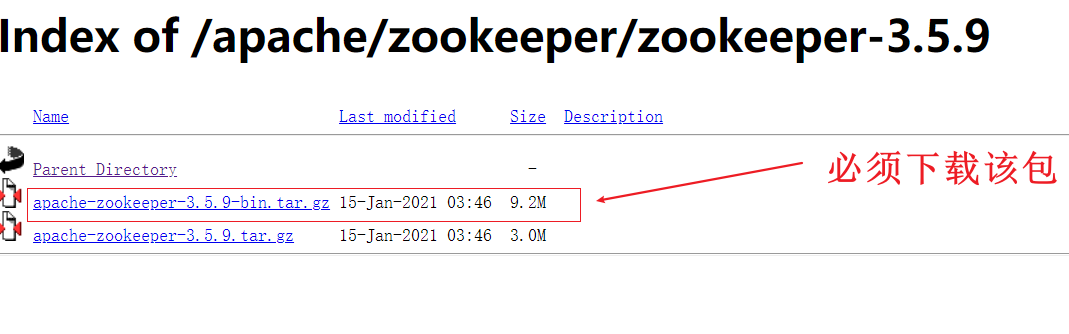
严重说明:在官网上有两个tar.gz文件,从目前的最新版本3.5.5开始,带有bin名称的包才是我们想要的下载可以直接使用的里面有编译后的二进制的包,而之前的普通的tar.gz的包里面是只是源码的包无法直接使用。 亲测已解决。
$ cd /opt/softwares/
# 北理工镜像源 https://mirror.bit.edu.cn/web/,如果下载不下来,可以将其下载到本地,然后上传到服务器目录
# $ wget https://mirror.bit.edu.cn/apache/zookeeper/zookeeper-3.5.9/apache-zookeeper-3.5.9.tar.gz  # 该包无法启动,需要下载bin包
# $ tar -zxvf apache-zookeeper-3.5.9.tar.gz -C /opt/modules/
$ wget https://mirror.bit.edu.cn/apache/zookeeper/zookeeper-3.5.9/apache-zookeeper-3.5.9-bin.tar.gz
$ tar -zxvf apache-zookeeper-3.5.9-bin.tar.gz -C /opt/modules/
2、编写配置文件
切换目录到安装目录下,安装目录名字 apache-zookeeper-3.5.9-bin 有些长,将名字改为 zookeeper-3.5.9 方便后续操作
cd /opt/modules/
[root@centos01 modules]# ls -l
总用量 4
drwxr-xr-x. 13 root   root   4096 7月  17 11:03 apache-zookeeper-3.5.9-bin
drwxr-xr-x. 12 hadoop hadoop  185 7月   7 08:37 hadoop-3.1.3
drwxr-xr-x.  7 hadoop hadoop  245 4月   2 2019 jdk1.8.0_211
[root@centos01 modules]# mv apache-zookeeper-3.5.9-bin zookeeper-3.5.9
[root@centos01 modules]# ls -l
总用量 4
drwxr-xr-x. 12 hadoop hadoop  185 7月   7 08:37 hadoop-3.1.3
drwxr-xr-x.  7 hadoop hadoop  245 4月   2 2019 jdk1.8.0_211
drwxr-xr-x. 13 root   root   4096 7月  17 11:03 zookeeper-3.5.9

[root@centos01 modules]# cd zookeeper-3.5.9/
[root@centos01 zookeeper-3.5.9]# ls -l
总用量 32
drwxr-xr-x. 2  502 games   232 1月   7 2021 bin
drwxr-xr-x. 2  502 games    77 1月   7 2021 conf
drwxr-xr-x. 5  502 games  4096 1月   7 2021 docs
drwxr-xr-x. 2 root root   4096 7月  17 13:13 lib
-rw-r--r--. 1  502 games 11358 10月  5 2020 LICENSE.txt
-rw-r--r--. 1  502 games   432 1月   7 2021 NOTICE.txt
-rw-r--r--. 1  502 games  1560 1月   7 2021 README.md
-rw-r--r--. 1  502 games  1347 1月   7 2021 README_packaging.txt

[root@centos01 zookeeper-3.5.9]# mkdir dataDir
(1) 在 Zookeeper 安装目录下新建文件夹 dataDir,用于存放 ZooKeeper相关数据
(2) 在 Zookeeper安装目录下的conf 文件夹中复制zoo_sample.cfg 配置文件 为zoo.cfg, 修改一些内容:
$ cd zookeeper-3.5.9
$ cd conf/
$ cp zoo_sample.cfg zoo.cfg原始文件zoo.cfg:
# The number of milliseconds of each tick
tickTime=2000
# The number of ticks that the initial
# synchronization phase can take
initLimit=10
# The number of ticks that can pass between
# sending a request and getting an acknowledgement
syncLimit=5
# the directory where the snapshot is stored.
# do not use /tmp for storage, /tmp here is just
# example sakes.
dataDir=/tmp/zookeeper
# the port at which the clients will connect
clientPort=2181
# the maximum number of client connections.
# increase this if you need to handle more clients
#maxClientCnxns=60
#
# Be sure to read the maintenance section of the
# administrator guide before turning on autopurge.
#
# http://zookeeper.apache.org/doc/current/zookeeperAdmin.html#sc_maintenance
#
# The number of snapshots to retain in dataDir
#autopurge.snapRetainCount=3
# Purge task interval in hours
# Set to "0" to disable auto purge feature
#autopurge.purgeInterval=1
修改后的 zoo.cfg 文件:
[root@centos01 conf]# vi zoo.cfg
[root@centos01 conf]# cat zoo.cfg
# The number of milliseconds of each tick
tickTime=2000
# The number of ticks that the initial
# synchronization phase can take
initLimit=10
# The number of ticks that can pass between
# sending a request and getting an acknowledgement
syncLimit=5
# the directory where the snapshot is stored.
# do not use /tmp for storage, /tmp here is just
# example sakes.
# 修改后的路径
dataDir=/opt/modules/zookeeper-3.5.9/dataDir
# the port at which the clients will connect
clientPort=2181
# the maximum number of client connections.
# increase this if you need to handle more clients
#maxClientCnxns=60
#
# Be sure to read the maintenance section of the
# administrator guide before turning on autopurge.
#
# http://zookeeper.apache.org/doc/current/zookeeperAdmin.html#sc_maintenance
#
# The number of snapshots to retain in dataDir
#autopurge.snapRetainCount=3
# Purge task interval in hours
# Set to "0" to disable auto purge feature
#autopurge.purgeInterval=1
#集群配置
server.1=centos01:2888:3888
server.2=centos02:2888:3888
server.3=centos03:2888:3888
(3)、在配置文件 zoo.cfg 中的参数 dataDir 指定的目录下,此处为/opt/modules/zookeeper-3.5.9/dataDir 新建一个名为 myid文件,这个文件仅包含一行内容,即当前服务器的id值,与参数server.id 中的 id 值相同。本例中,当前服务器(centos01) 的id值为1,则应该在myid 文件中写入数字。ZooKeeper 启动时会读取该文件,将其中的数据与 zoo.cfg 里写入的配置信息进行对比,从而获取当前服务器的身份新信息。
创建 myid 文件:
cd  /opt/modules/zookeeper-3.5.9/dataDir
vi myid
1

[root@centos01 dataDir]# cat myid
1
3、复制Zookeeper安装信息到其他节点
centos01 节点安装完成后,需要复制整个 Zookeeper 安装目录到 centos02、centos03 节点,命令如下:
# centos02 主机用户 hadoop 的密码为 hadoop@123
$ scp -r /opt/modules/zookeeper-3.5.9  hadoop@centos02:/opt/modules/
$ scp -r /opt/modules/zookeeper-3.5.9  hadoop@centos03:/opt/modules/
4、修改其他节点配置
复制完成后,需要将 centos02 和 centos03 节点中的myid 文件值修改为对应的数字,即作出如下操作:
- 修改 centos02 节点中的
/opt/modules/zookeeper-3.5.9/dataDir/myid文件中的值为2。 - 修改 centos03 节点中的
/opt/modules/zookeeper-3.5.9/dataDir/myid文件中的值为3。
5、启动ZooKeeper
分别进入到每个节点的 zookeeper 安装目录,执行以下命令启动各节点的ZooKeeper
$ bin/zkServer.sh start启动时输出以下信息代表启动成功:
cd /opt/modules/zookeeper-3.5.9/bin
[root@centos01 bin]# ./zkServer.sh start
ZooKeeper JMX enabled by default
Using config: /opt/modules/zookeeper-3.5.9/bin/../conf/zoo.cfg
Starting zookeeper ... STARTED
注意: zookeeper 集群的启动与Hadoop不同,其需要在每台装有 Zookeeper 的服务器上都执行一次启动命令,这样才能使整个集群启动起来。
查看命令:
[root@centos01 bin]# ./zkServer.sh
ZooKeeper JMX enabled by default
Using config: /opt/modules/zookeeper-3.5.9/bin/../conf/zoo.cfg
Usage: ./zkServer.sh [--config <conf-dir>] {start|start-foreground|stop|restart|status|print-cmd}
6、查看启动状态
正常启动
[root@centos01 bin]# ./zkServer.sh status
ZooKeeper JMX enabled by default
Using config: /opt/modules/zookeeper-3.5.9/bin/../conf/zoo.cfg
Client port found: 2181. Client address: localhost. Client SSL: false.
Mode: followe
centos02:
[root@centos02 bin]# ./zkServer.sh status
ZooKeeper JMX enabled by default
Using config: /opt/modules/zookeeper-3.5.9/bin/../conf/zoo.cfg
Client port found: 2181. Client address: localhost. Client SSL: false.
Mode: leader
异常情况
[root@centos01 bin]# ./zkServer.sh status
ZooKeeper JMX enabled by default
Using config: /opt/modules/zookeeper-3.5.9/bin/../conf/zoo.cfg
Client port found: 2181. Client address: localhost. Client SSL: false.
Error contacting service. It is probably not running.
[root@centos01 bin]#
在查看启动状态时,如果出现以上信息,说明集群启动不成功,出现错误:
Error contacting service. It is probably not running.此时需要修改 ZooKeeper 安装目录下的 bin/zkEnv.sh 文件中的以下内容:
if [ "x${ZOO_LOG4J_PROP}" = "x" ]
then
    ZOO_LOG4J_PROP="INFO,CONSOLE"
fi将上述的CONSOLE 修改为ROLLINGFILE,使其将错误信息输出到日志文件,修改后的内容如下:
if [ "x${ZOO_LOG4J_PROP}" = "x" ]
then
    ZOO_LOG4J_PROP="INFO,ROLLINGFILE"
fi
修改完成后,重新启动集群,查看在 Zookeeper 安装目录下生成的日志文件 zookeeper.log,发现以下错误:
[root@centos01 bin]# ./zkServer.sh stop

[root@centos01 logs]# cat zookeeper-root-server-centos01.out
错误: 找不到或无法加载主类 org.apache.zookeeper.server.quorum.QuorumPeerMain
问题修复(如果出现问题请看下边解决方案)
网友经验:实际上应该是你下载错了文件。在官网上有两个tar.gz文件,从目前的最新版本3.5.5开始,带有bin名称的包才是我们想要的下载可以直接使用的里面有编译后的二进制的包,而之前的普通的tar.gz的包里面是只是源码的包无法直接使用。 亲测已解决。
经过一番折腾,原来是下错了安装包,3.5.5开始需要下载带有bin名称的包。
在该镜像官网查看:https://mirror.bit.edu.cn/apache/zookeeper/zookeeper-3.5.9
重新下载,进行解压:
$ wget https://mirror.bit.edu.cn/apache/zookeeper/zookeeper-3.5.9/apache-zookeeper-3.5.9-bin.tar.gz
$ tar -zxvf apache-zookeeper-3.5.9-bin.tar.gz -C /opt/modules/
然后重新执行以上步骤即可。
二、Java API 操作
在pom.xml 文件中引入依赖
 <dependency>
            <groupId>org.apache.zookeeper</groupId>
            <artifactId>zookeeper</artifactId>
            <version>3.4.10</version>
        </dependency>
ZookeeperDemo.java
package com.homay.hadoopstudy;

import org.apache.zookeeper.CreateMode;
import org.apache.zookeeper.KeeperException;
import org.apache.zookeeper.ZooDefs;
import org.apache.zookeeper.ZooKeeper;

import java.io.IOException;

/**
 * 创建Zookeeper节点,并设置元数据
 *
 * @author: kaiyi
 * @Date 2021/7/17 13:32
 */
public class ZookeeperDemo {

    public static void main(String[] args) throws IOException, KeeperException, InterruptedException {
        // 连接字符串
        String connectStr = "centos01:2181,centos02:2181,centos03:2181";

        ZooKeeper zk = new ZooKeeper(connectStr, 3000, null);

        String path = zk.create("/zk001", "zk001_data".getBytes(),
                ZooDefs.Ids.OPEN_ACL_UNSAFE,
                CreateMode.PERSISTENT
        );

        System.out.println(path);

    }
}
节点操作实例:
package com.atguigu.zkclient;

import org.apache.zookeeper.*;
import org.apache.zookeeper.data.Stat;
import org.junit.After;
import org.junit.Before;
import org.junit.Test;

import java.io.IOException;
import java.util.List;

public class ZkClient {
    private ZooKeeper zooKeeper;
    /**
     * 创建新节点
     * @throws IOException
     */
    @Test
    public void create() throws KeeperException, InterruptedException {
        //2. 做事情
        zooKeeper.create(
                "/testAPI",
                "123".getBytes(),
                ZooDefs.Ids.OPEN_ACL_UNSAFE,
                CreateMode.PERSISTENT
        );
    }

    @Before
    public void before() throws IOException {
        //Zookeeper链接地址
        String connectString = "hadoop102:2181,hadoop103:2181,hadoop104:2181";

        //会话超时时间
        int sessionTimeout = 2000;
        //1. 创建一个Zookeeper对象
        zooKeeper = new ZooKeeper(connectString,        //Zookeeper地址
                sessionTimeout,             //超时时间
                new Watcher() {
                    //Zookeeper监听的回调函数
                    public void process(WatchedEvent watchedEvent) {
                    }
                });
    }

    @After
    public void after() throws InterruptedException {
        //3. 关闭资源
        zooKeeper.close();
    }

    /**
     * 查询子节点
     */
    @Test
    public void ls() throws KeeperException, InterruptedException {
        List<String> children = zooKeeper.getChildren(
                "/",
                new Watcher() {
                    public void process(WatchedEvent event) {
                        System.out.println("自定义回调函数");
                    }
                }
        );

        for (String child : children) {
            System.out.println(child);
        }

        Thread.sleep(Long.MAX_VALUE);
    }

    /**
     * 查询节点的值
     */
    @Test
    public void get() throws KeeperException, InterruptedException, IOException {

        //节点状态(Stat结构体)
        Stat stat = new Stat();
        byte[] data = zooKeeper.getData("/testAPI", false, stat);

        System.out.println(stat.getDataLength());
        System.out.write(data);
        System.out.println();
    }

    /**
     * 查询一个节点的状态
     */
    @Test
    public void stat() throws KeeperException, InterruptedException {

        //查看一个节点是否存在
        Stat stat = zooKeeper.exists("/testI", false);
        if (stat == null) {
            System.out.println("节点不存在");
        } else {
            System.out.println(stat);
        }
    }

    @Test
    public void set() throws KeeperException, InterruptedException {
        String node = "/testAPI";

        Stat stat = zooKeeper.exists(node, false);

        //version目的之保证“我要修改的”和“我实际修改的”是同一个东西
        if (stat == null) {
            System.out.println("节点不存在");
        } else {
            zooKeeper.setData(
                    "/testAPI",
                    "abcd".getBytes(),
                    stat.getVersion()
            );
        }
    }

    @Test
    public void delete() throws KeeperException, InterruptedException {
        zooKeeper.delete(
                "/testAPI",
                1
        );
    }
}
相关文章:
zookeeper 启动时一直报:Starting zookeeper ... FAILED TO START
为者常成,行者常至
自由转载-非商用-非衍生-保持署名(创意共享3.0许可证)


